Archive
The Archive module allows you to create compressed data files (zstd algorithm) from Energy Logserver indices. The archive checks the age of each document in the index and if it is older than defined in the job, it is copied to the archive file.
Configuration
Enabling module
To configure the module edit the UI main configuration file and set path to the archive directory - location where the archive files will be stored:
vim /etc/logserver-gui/logserver-gui.yml
remove the comment from the following line and set the correct path to the archive directory:
archive.archivefolderpath: '/usr/share/logserver-gui/data/archive/archives/'
Archives will be saved inside above directory in the subdirectories that describes year and month of its creation. For example:
/usr/share/logserver-gui/data/archive/archives
├── 2022
│   └── 08
│       ├── enc3_2022-08-15.json.zstd
│       └── skimmer-2022.08_2022-08-06.json.zstd
└── 2023
    ├── 05
    │   ├── enc1_2023-05-25.json.zstd
    │   ├── enc2_2023-05-25.json.zstd
    │   └── skimmer-2023.05_2023-05-25.json.zstd
    └── 07
        └── skimmer-2023.07_2023-07-30.json.zstd
Archive Task
Create Archive task
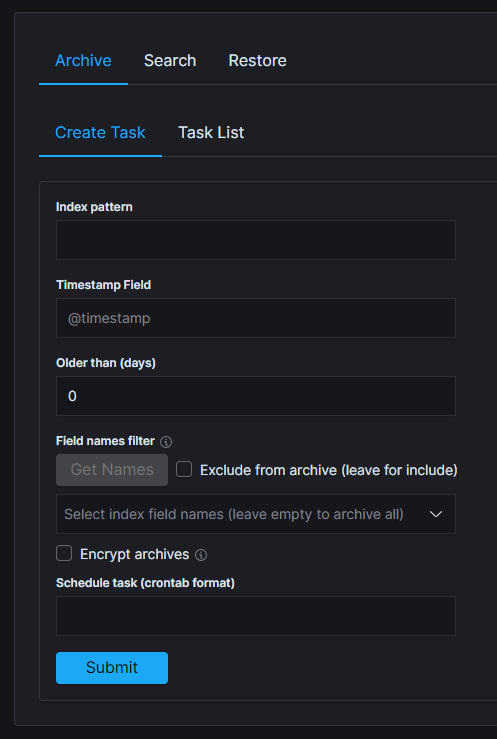
From the main navigation go to the “Archive” module.
On the “Archive” tab select “Create Task” and define the following parameters:
Index pattern- for the indices that will be archived, for example,syslog*Timestamp field- time field of the indices (default @timestamp)Older than (days)- number of days after which documents will be archivedField names filter- filter fields that should be archivedSchedule task(crontab format) - the work schedule of the ordered task.
Under Options:
Archives retention- keep only archives from a chosen time window; older files are removed automatically.Encryption- after enabling encryption, prompt with two password fields will be shown.Recreate missing files- re-run the job on dates whose archive file has been deleted, so that the archive set can be rebuilt.
Task List
In the Task List, you can follow the current status of ordered tasks. You can modify the task scheduler or delete a single or many tasks at once.
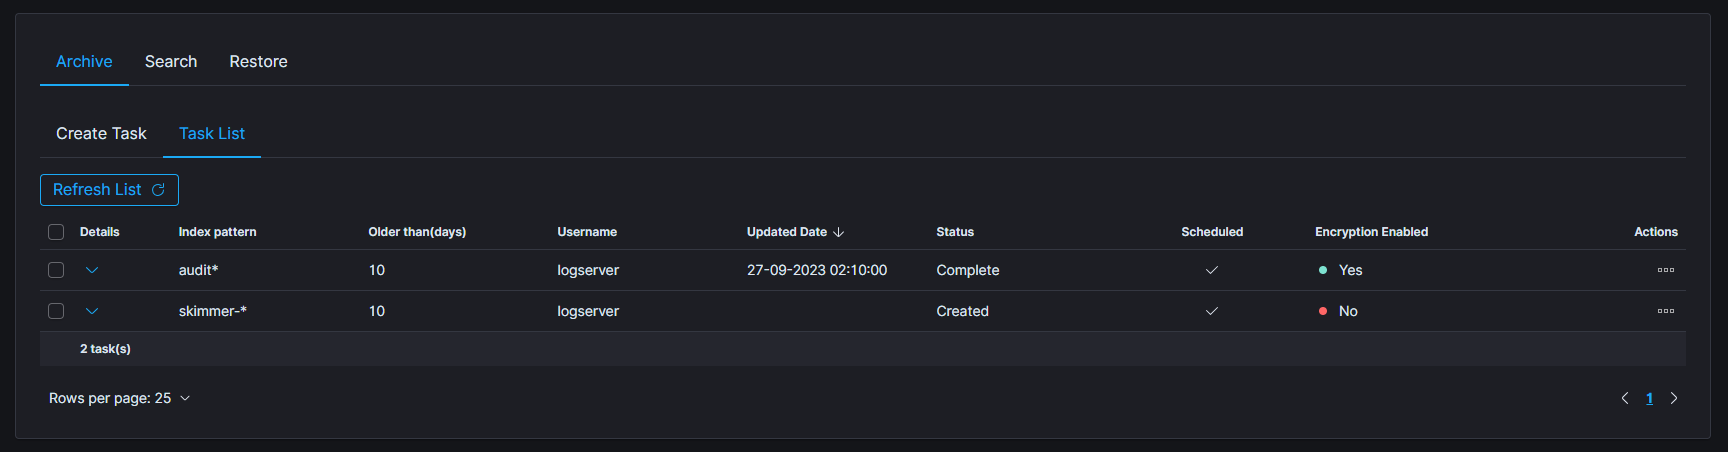
If the archiving task finds an existing archive file that matches the data being archived, it will check the number of documents in the archive and the number of documents in the index. If there is a difference in the number of documents then new documents will be added to the archive file.
To show more details of the task, click on the details cell of the desired row.
Archive Search
The Archive Search module can search archive files for the specific content and return results in the Task List
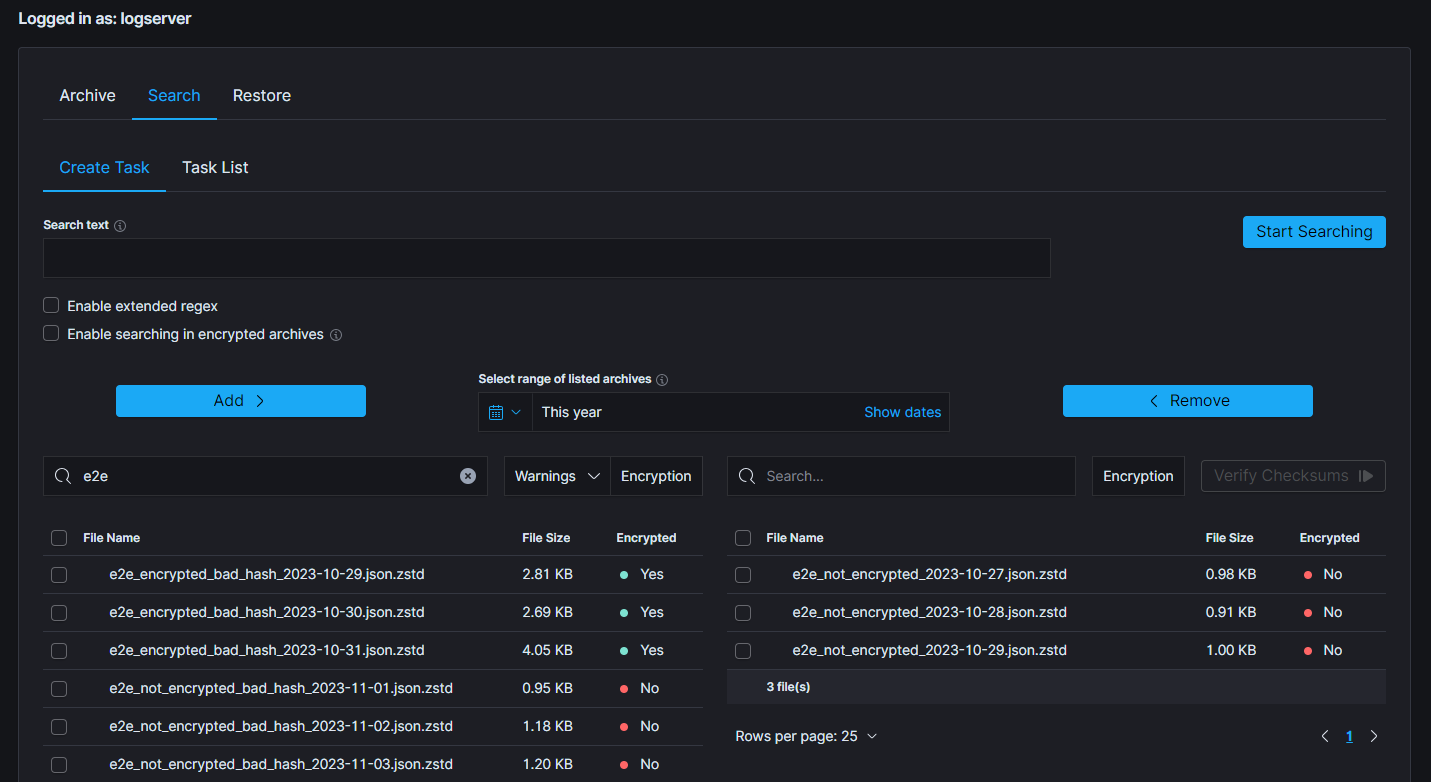
Create Search task
From the main navigation go to the
Archivemodule.On the
Searchtab selectCreate Taskand define the following parameters:Search text- field for entering the text to be searched.Enable extended regex- treat the search text as an extended regular expression instead of a plain string.Enable searching in encrypted archives- enable option to search in encrypted archives.Select range of listed archives- files that match the selected range are displayed in the left-hand list (default last 14 days). Use theWarningsandEncryptedfilters above the list to narrow it down.Move the archives to search through from the left list to the right list with
Add; useRemoveto take them back.
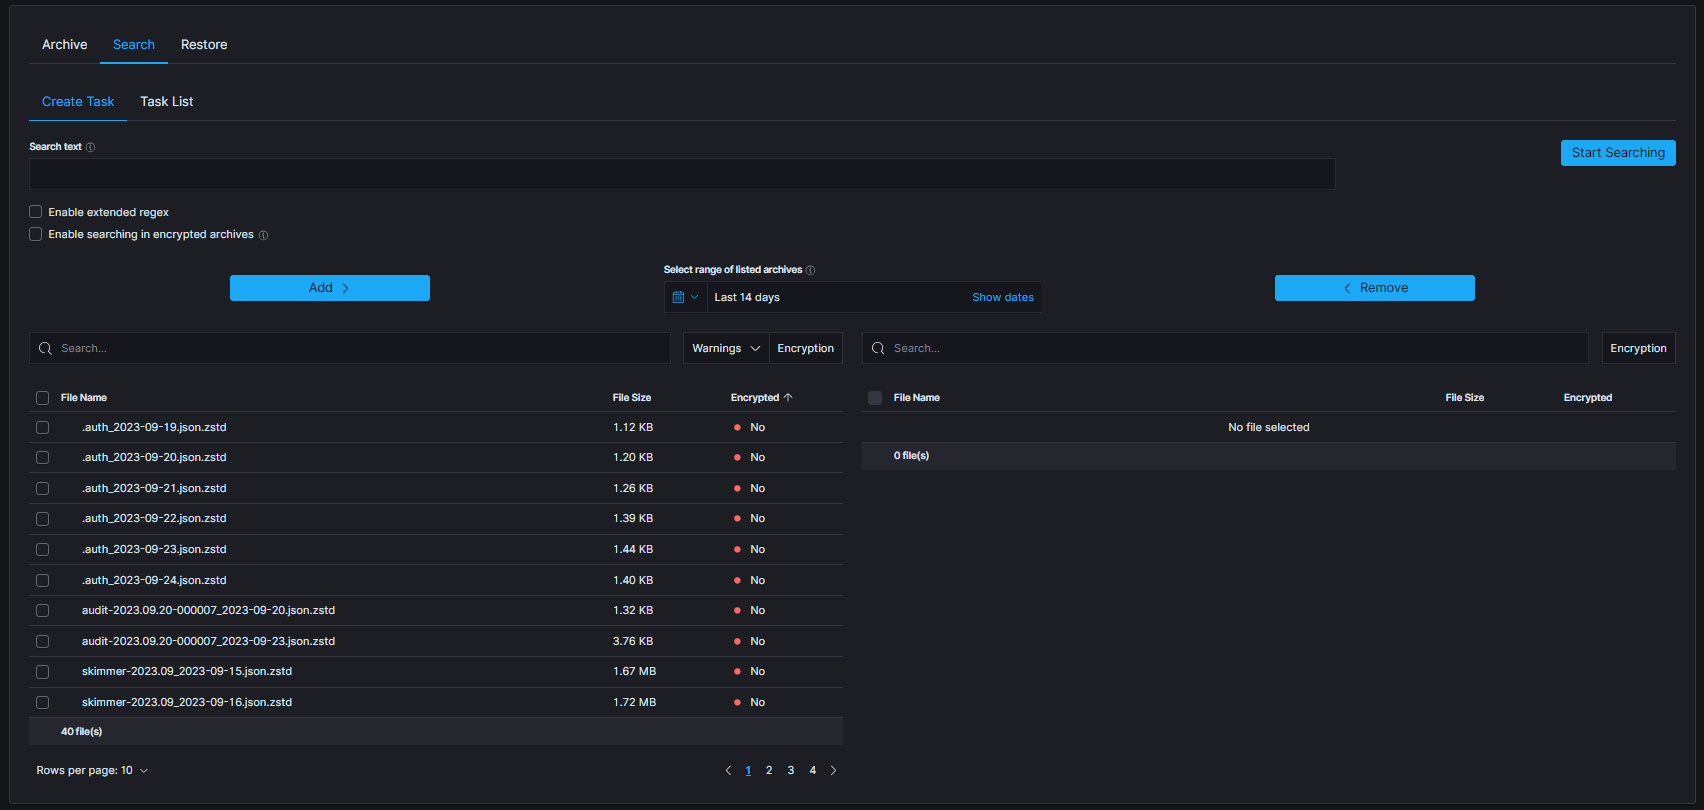
The table footer shows the total number of found files for the specified date range.
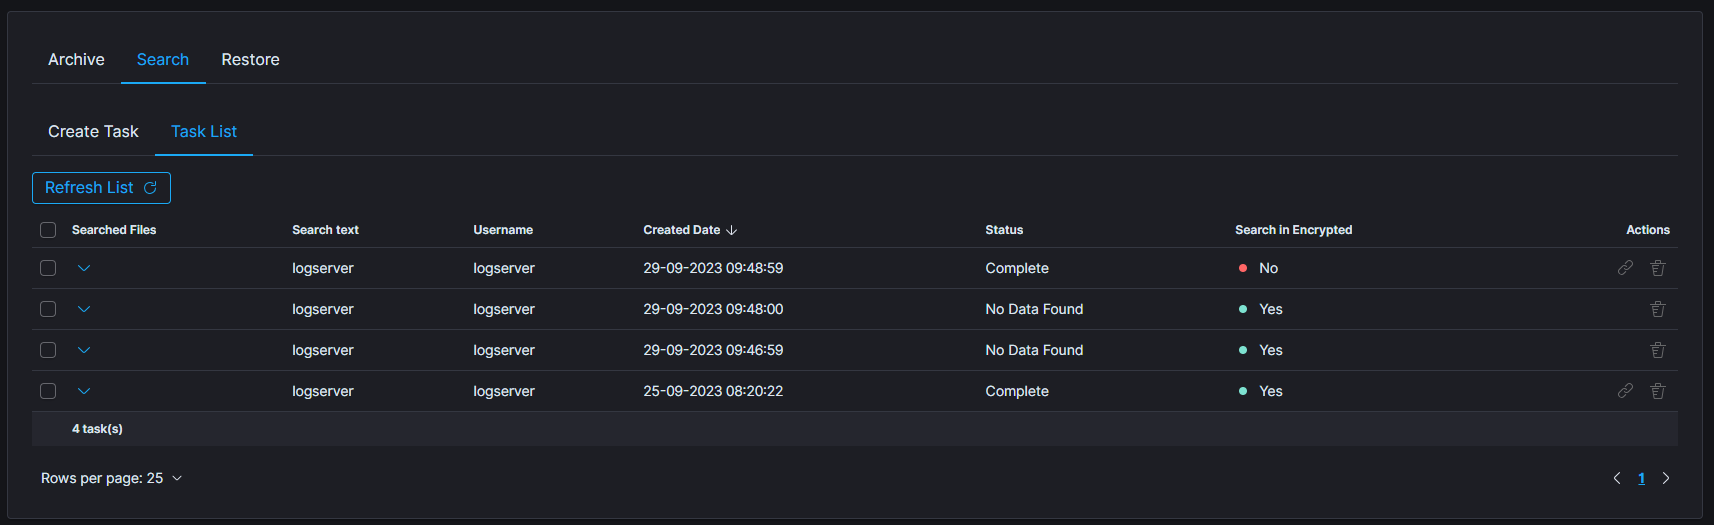
Search Task List
The searching process can take a long time. On the Task List, you can follow the status of the searching process. Also, you can view results and delete tasks.
Archive Restore
The Archive Restore module moves data from the archive to the Energy Logserver index and makes it available online.
Create Restore task
From the main navigation go to the
Archivemodule.On the
Restoretab selectCreate Taskand define the following parameters:
Destination index- If a destination index does not exist it will be created. If exists data will be appended.Disable checksum verification- skip the checksum check that otherwise guards against corrupted archives. Use only when a known-good archive fails verification for reasons unrelated to its content.Enable restoring from encrypted archives- enable option to restore data from encrypted archives.Select range of listed archives- files that match the selected range are displayed in the left-hand list (default last 14 days). Use theWarningsandEncryptedfilters above the list to narrow it down.Move the archives to restore from the left list to the right list with
Add; useRemoveto take them back.
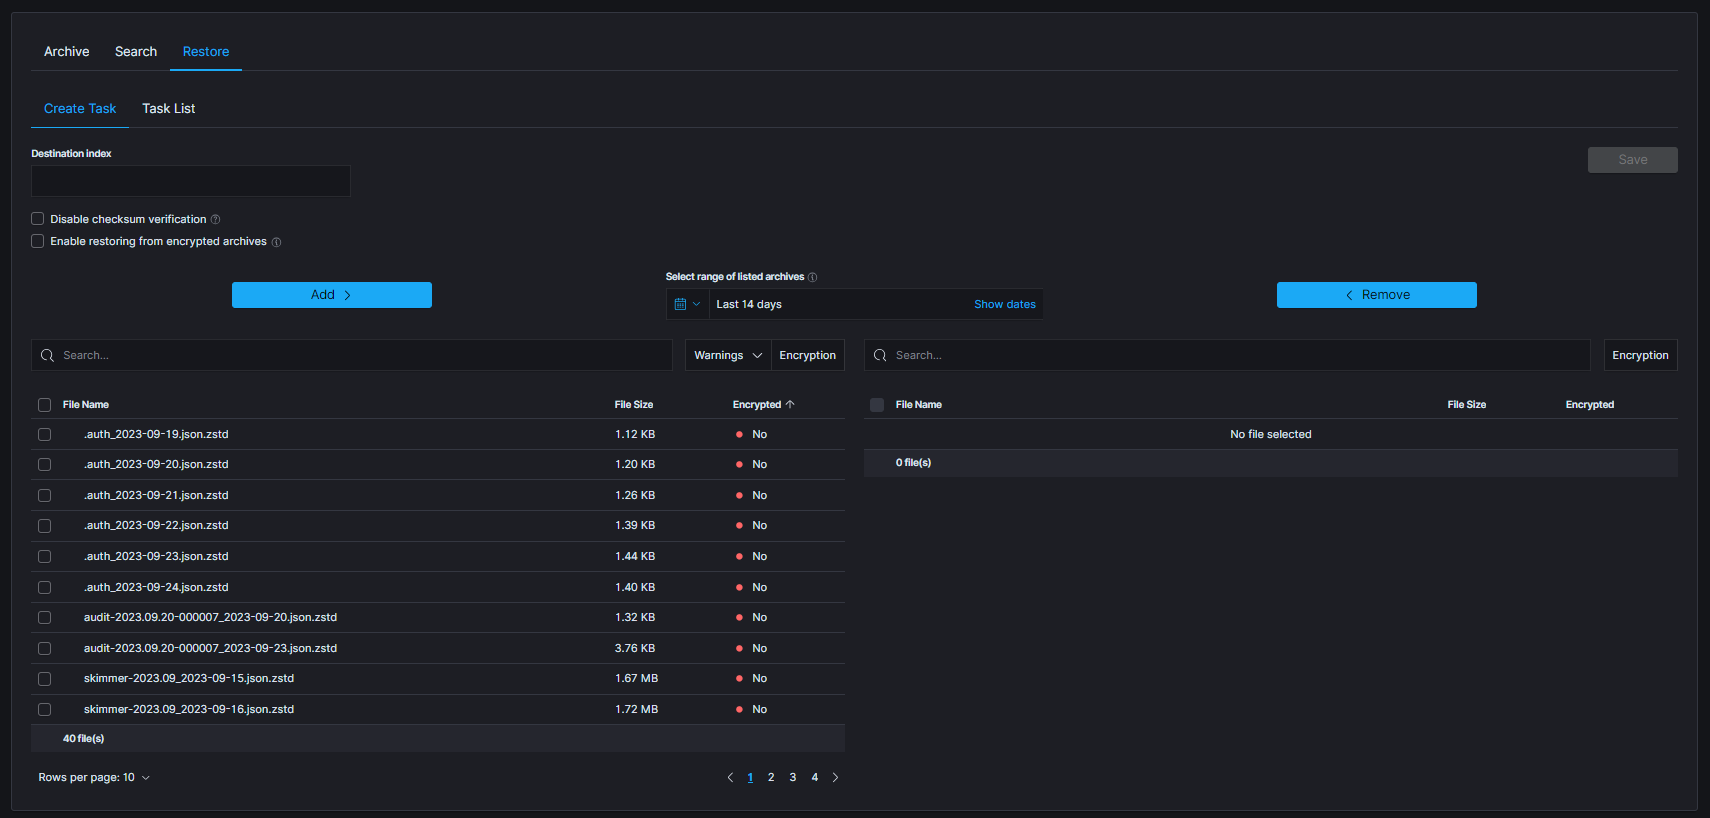
The table footer shows the total number of found files for the specified date range.
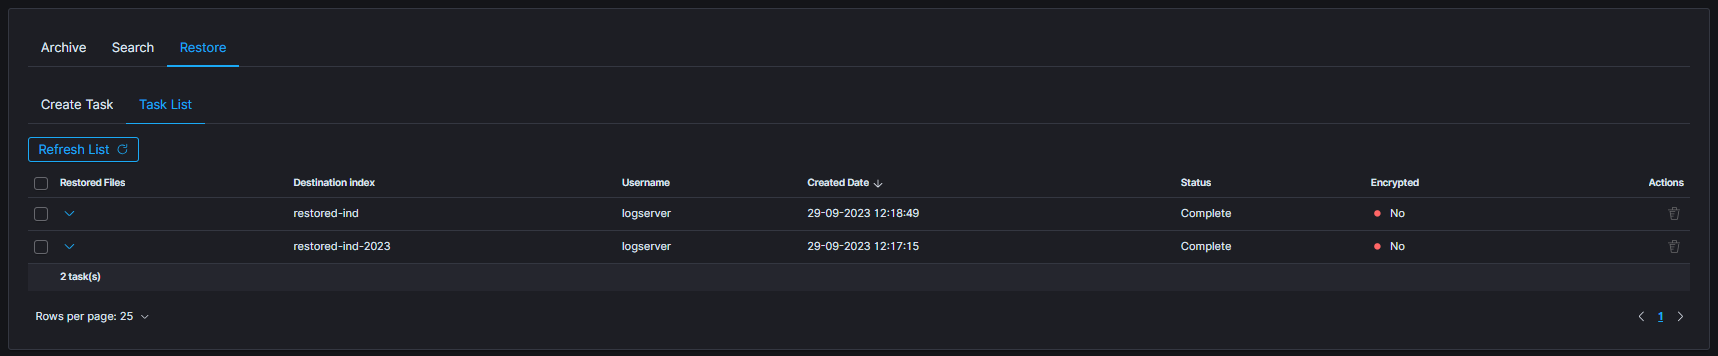
Restore Task List
The process will index data back into the Data Node. Depending on archive size, the process can take a long time. On the Task List you can follow the status of the recovery process. Also you can view result and delete tasks.
Search/Restore task with archives without metadata
When creating Search or Restore tasks, the left-hand list of archives can be filtered by the Warnings dropdown above it. The dropdown offers three categories, each with a counter of matching files:
Metadata- the archive is listed but its metadata record could not be found.File- metadata exists but the archive file itself is missing from disk.Integrity- metadata and file are present, but the stored checksum does not match the archive contents.

When particular archive’s metadata could not be found following icon will be displayed:
![]()
That archive can be used for task creation, but there are some issues to keep in mind:
encryption status of the archive without metadata cannot be established (can be either encrypted or not)
when task has enabled encryption handling (e.g.
Enable restoring from encrypted archivesorEnable searching in encrypted archives), archives will be decrypted with provided password. If archive was not decrypted, an error is expectedwhen archive is potentially encrypted and password is not provided, an error is expected.
On the other hand, when metadata is present, but archive itself could not be located, following icon will be displayed: ![]()
That archive cannot be used for task creation and so cannot be selected.
Archive Clean
The Clean tab allows you to delete data from the archive.
To do so, go to the Clean section in the Archive tab.
Then, check the boxes next to the files you want to delete and press the Delete button in the top right corner.
Archive Directory Structure
New archives will be created in the configured archive.archivefolderpath in a systematic order. They can be found under a path based on the date the archive was created: /\(archivefolderpath/\)year/$month. This method of storing archives ensures better readability and significantly simplifies viewing large numbers of files.
The final directory is determined by the last segment of the archive name, which contains the archive creation date. For example, assuming that the root archivefolderpath is set to /download, archive sample-archive_2023-11-01.json.zstd will be saved to the /download/2023/11/ automatically created directory.
Archives once saved to the root directory will be displayed normally in the GUI and will be accessible in the same way as those saved in a sorted manner.
Archives Checksum Verification
Archives checksum verification feature has been integrated into the Create Task section, enhancing the functionality of both the Search and Restore tabs. This feature adds an extra layer of confidence in the accuracy and reliability of the stored files.
Starting Verification
To start the verification process navigate to one of the mentioned tabs. Select archives that will be checked and move them to the right-side table. Below picture presents the button that will be activated, as soon as any complete archives (without any warning) will be selected in the right table. Archives without metadata cannot be utilized due to the lack of necessary details.
In order to optimize resource utilization and enhance the overall efficiency, a double selection mechanism has been implemented for the file checksum verification, acknowledging the resource-intensive nature of this feature. This ensures, that only desired files will be processed.
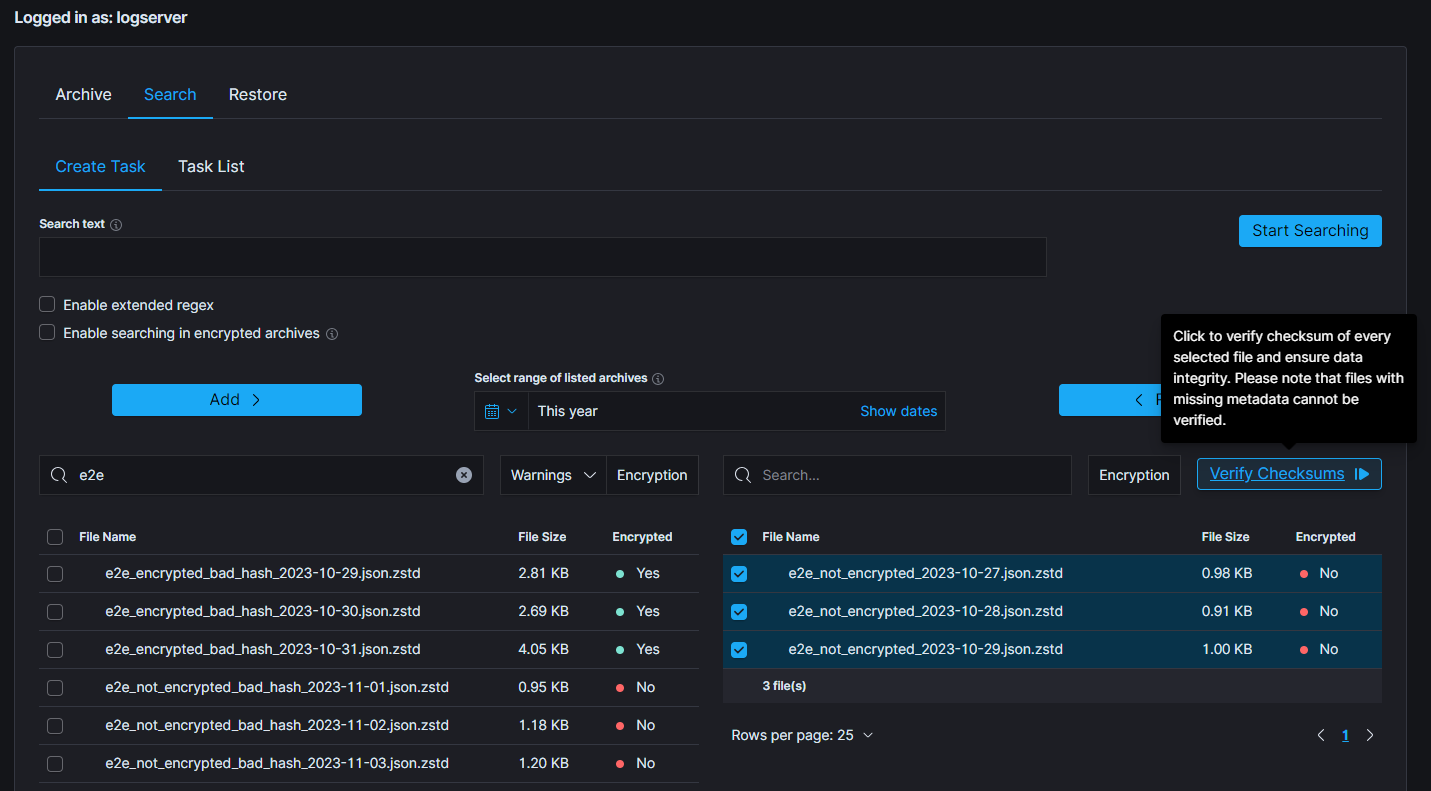
Above picture presents correctly selected archives and a situation when the verification can be started by clicking the Verify button. The following modal is displayed.
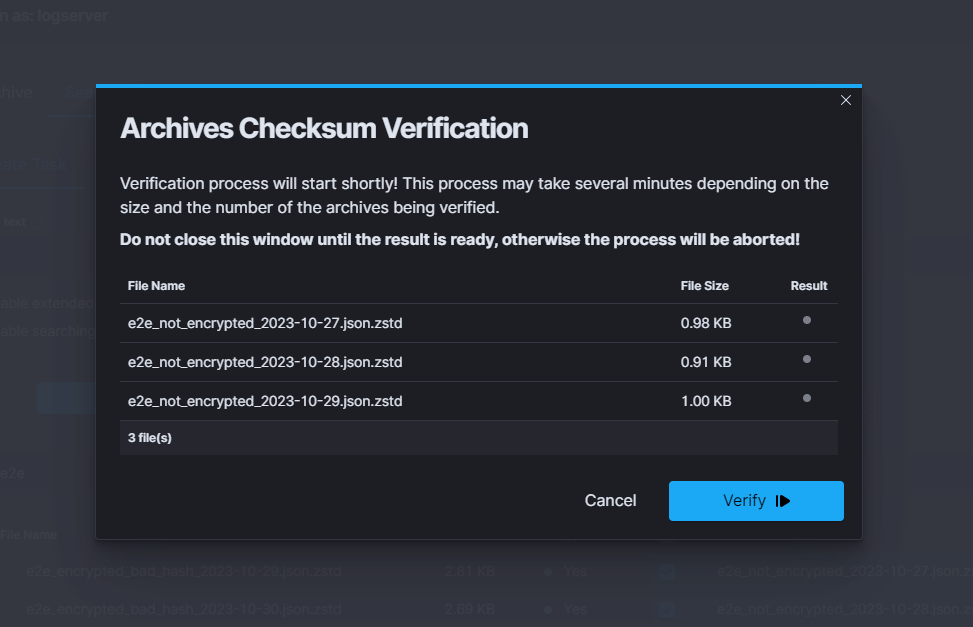
The modal lists the selected files along with their size and a placeholder for the per-file result. Hovering over a result dot reveals additional information - the current status of the verification or, if a file failed, the reason why.
To start verification, click the Verify button in the bottom right corner.
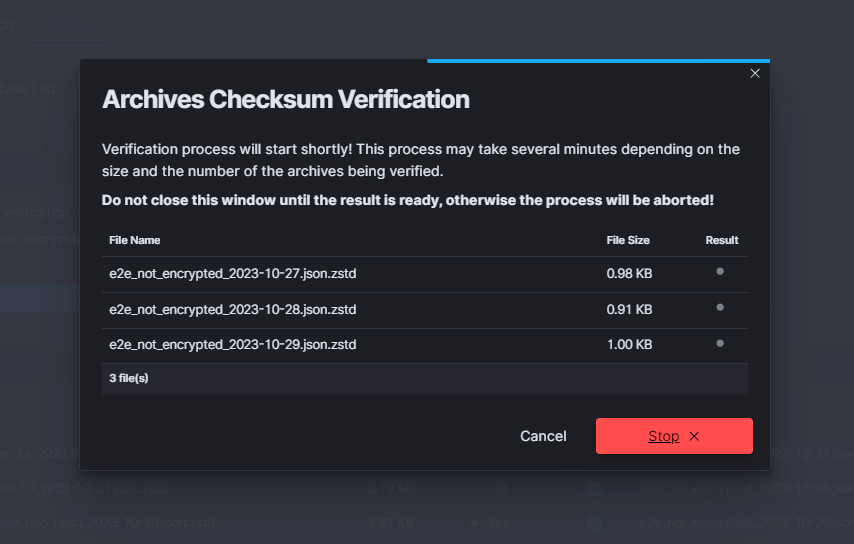
While the process runs, the button changes to Stop and the modal must stay open - closing or reloading the page aborts the verification.
Verification Result
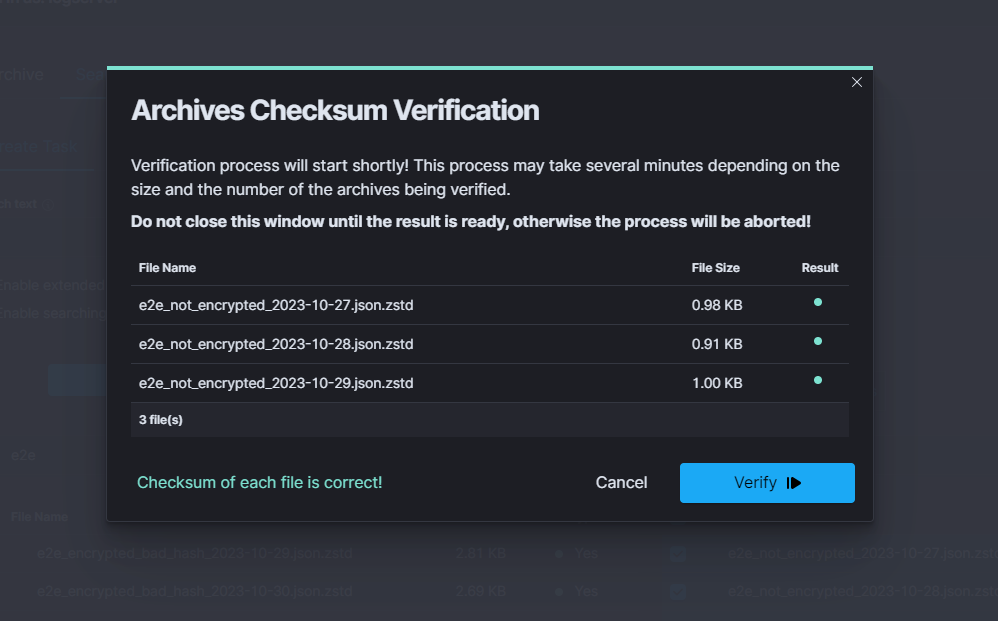
When verification completes, the summary appears in the bottom left corner of the modal and each row gets a coloured dot in the Result column. The summary message reflects the overall outcome:
green - every archive passed the checksum check (message
Every file is correct!).yellow - some archives passed, others did not.
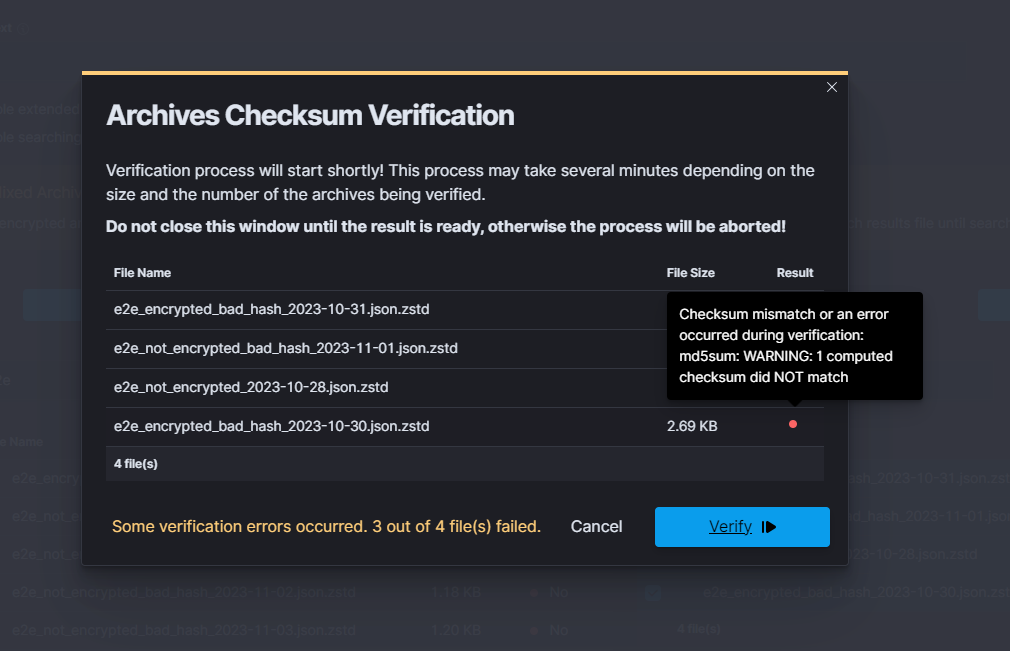
red - every selected archive failed verification.
Hovering over any result dot shows a tooltip with the status of that file. For failed rows the tooltip contains the error message that explains why verification did not pass.
Identifying progress of archivisation/restoration process
The /usr/share/logserver-gui/data/archive/tasks directory contains metadata files, that indicates the current status of the task. These files contain information about all indices, that:
are about to be processed (“Waiting” status)
are processing (“Running” status)
were processed (“Complete” status)
If everything went according to the plan and the process has successfully finished, that metadata file will be removed. However, when some index cannot be processed or something unexpected happened, there will be “Error” status, with detailed message in the “error” field and metadata will remain in the system.
The above described situation is reflected in the GUI by the Status column in the Task List tables.
Moreover, in the metadata files can be found current process id (pid), total documents count and encryption details.
Uncompleted Tasks removal
List archive folder and find filename generated by uncompleted task.
ls -la /archivefolderpath/
-rw-r--r--. 1 user group          13 Mar 21 10:07 prd-srv-win-ad-2022.12.
21_2022-12-21.json.zstd
Find document in
.archiveindex using filename from previous stepcurl -s -k -X GET -ulogserver:... http://127.0.0.1:9200/.archive/_search?size=10000 |jq '.'| grep -B4 "prd-srv-win-ad-2022.12.21"Write down it’s ID
"_id": "Q8teA4cBj_ghAWXFcMJA",
      "_score": 1.0,
      "_source": {
        "date": "2023-03-21T08:52:13.502Z",
        "filename": "prd-srv-win-ad-2022.12.21_2022-12-21.json.zstd",
Remove document using saved ID
curl -s -k -X DELETE -ulogserver:... http://127.0.0.1:9200/.archive/_doc/Q8teA4cBj_ghAWXFcMJA
Command Line tools
Archive files can be handled by the following commands zstd, zstdcat, zstdgrep, zstdless, zstdmt.
zstd
The command for decompress *.zstd the Archive files, for example:
zstd -d winlogbeat-2020.10_2020-10-23.json.zstd -o
 winlogbeat-2020.10_2020-10-23.json
zstdcat
The command for concatenate *.zstd Archive files and print content on the standard output, for example:
zstdcat winlogbeat-2020.10_2020-10-23.json.zstd
zstdgrep
The command for print lines matching a pattern from *.zstd Archive files, for example:
zstdgrep "optima" winlogbeat-2020.10_2020-10-23.json.zstd
Above example is searching documents contain the “optima” phrase in winlogbeat-2020.10_2020-10-23.json.zstd archive file.
zstdless
The command for viewing Archive *.zstd files, for example:
zstdless winlogbeat-2020.10_2020-10-23.json.zstd
zstdmt
The command for compress and decompress Archive *.zstd file using multiple CPU core (default is 1), for example:
zstdmt -d winlogbeat-2020.10_2020-10-23.json.zstd -o winlogbeat-2020.10_2020-10-23.json